 |
Converting a dark elf model
Hello Folks and welcome to a simple model conversion walkthrough.
What I will show you is the conversion of a sword swinger to a spear/standardbearer. The model I chose was the standard plasic
dark elf available from games workshop around 2000. As you can see in the tabletop section this technique not only works on
sword models but on nearly any model havind a hand stretched out a bit. I can not be made responsible for any injuries or damage done to you
or your models. DO NOT TRY THIS WITH YOUR already PAINTED MODELS!
| The things you will need |
|---|
| some cutting tool |
| any fast drying super glue |
| wood sticks (coctail/barbeque) |
| sword/spear model parts (optional) |
| durable workarea |

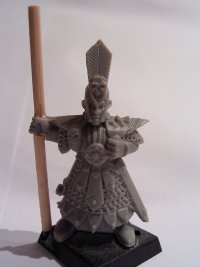
| The first step in the conversion is finding suitable model. Most of the time plasic models are
quite attractive as they lack diversity or have simpler poses than metal models. You can also use metal models
for conversion as well. On the left you can see a picture of my example standard model painted. Taking one of
these would be easy as they have an arm stretched away from the body. This suits well for placing other weapons
into this position, especially weapons with long shafts. Take one of these models, the cutting tool you prefere
and now cut of the remains of the weapon or thing placed in the hand of your model. Just cut the details away in one line so only the bare hand, normally in the form of a fist remains. In my example model I took a cutting knife, placed the model on my worktable (with metal protection) an cut the sword blade of. Do not throw the blade away, or cut it in pieces, you can use it as your spear tip if you do not have other parts.
|
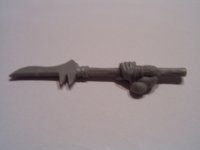
| Now take a look at the model displayed on the left side. We will glue some wood sticks as poles for our spear
onto the free fist. You can also use poles from other model parts as shown in the image below. If your sticks have pointed ends cut them away so you have sticks with normal plain ends.
Hold the stick to the side of your models fist so you can measure the length and angle the pole should be glued. You will need two pieces,
one for the lower shaft and one for the upper shaft. Cut the wood pieces in the desired length and the needed angle. Attaching the wood sticks is simpler if you were able to
cut the top and bottom of the fist to plan areas. To fix the wood sticks you need fast drying glue usable for wood, metal and plastic.
Apply a little drop of glue to the shaft and a little drop to the side of the fist the stick should be attached to.
Now wait half a minute (this depends on the glue you use) to let it dry, but not dry out. Then press the stick against
the fist and it should stay in place. If not try to repeat this process until the stick keeps at place. After
the shaft has been finished and dried place some extra glue around the contact areas for sure.
You can see my result to the left.
Sometimes if you have really twisted angles or the part to be attached does not want to stay in place you can try the following: drill a small hole into the place and cut the stick bottom to be able to stay in place in the hole. Then glue the parts together. The extension of the model part into the drilled hole will give some extra balance and will so keep firmly in place.
|
| Next we will create the spear blade. This step is optional. You can use the cut of blades from your model or use some blades from earlier models. Some model parts do not come with lose blades but you can easily cut them of by yourself. Just place the desired part on your workbench and cut the blade of with a plain cut around the bottom of the blade. Sometimes as in the Skaven model packages provided by games workshop they have spare parts for weapons and items. You can use these to make the described process of disasembling and
reattaching easier. For example a spear part will ony have to be cut in half and the is ready to be attached to your model. If you have such parts the next step will not needed.
|
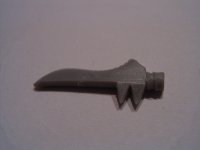
| The image to the left shows the cut of blade to be used for the spear. If you use wooden sticks as pole shafts you will have to glue the blade onto the shaft to finish the spear. Put some glue on the top of the pole where the blade will be placed. Let it dry a little then place some glue at the blade end. If you press the two glue ends together the blade should stick to the pole. Make sure the cutting side of the blade is rotated in a good direction. As you can see below I chose the blade to be directed to the side. Good directions range from
where the fist points to the direction where the fingers end on the model. At the one you would swing the spear at the other you would drop it down to wield it by two hands. As always choose a look and feel you like or feels natural to youh.
|

| The completely converted dark elf sword model to a dark elf spear model. Normally I wait for a day or two to let the glue dry hard and then start painting the model. That's it, good luck with your conversions.
|
Something missing? Mail to 
|
|
 | 2009-06-01
WoW Importer for Max |
| The World of Warcraft tool for 3D Studio has been updated. It now converts model files from WoW Client version 2.x (upto 2.7) and displays correct animations for multi mesh models. The script can be found here.... |
 | 2007-03-07
nGUI explained |
| If you ever wanted some more details on the nebula2 nGUI System you can find it in the nGUI System article. |
| 2006-10-17
Mangalore entity ID's |
| If you need information about the mangalore entity ID usage have a look here.. |
| 2006-08-06
Mangalore Articles |
| Added a new section about the mangalore game framework from radonlabs. The section contains some articles about my experience with mangalore. Read more here: |
| 2006-03-10
Free models |
| Finally some free models for the Radonlabs SDK. You can download them here. |
 | 2006-03-10
nmax for radonlabs SDK |
| Now you can also use 3D Studio Max for the official nebula radonlabs sdk. You can grab the port here. |
| 2004-10-29
Quake 2 Interpolator |
| The quake 2 interpolator has been updated to work with Nebula2 Grab the source including source for water package here... |
| 2004-10-29
Water package |
| The water algorithms package has been updated to work with Nebula 2. Grab the source including source for MD2 package here... |
|
|